You can check out my Cross Stitch Blog here :D
Showing posts with label stickles. Show all posts

Wednesday, 6 April 2011

Altered Note Book

Good evening everyone.

At the moment my PC is broke :( so I have had to use my OH's PC to upload photos etc. It's really annoying not being able to do this on my own PC, but it looks like this might be the only solution until we can get me a new PC. I do have a laptop, but I really don't like working on it!
So until then, this will have to do!

Anyways, I couldn't find my old notebook that I kept details in, on challenges, so I decided to turn a tatty old note book, that I found stuffed away somewhere, in to a brand spanking new 'Challenges' notebook. I know I do have all the challenges listed in my sidebar, but I like to have something by the side of me whist I actually craft.

You will notice that I don't have a watermark on these images, that is because that is stored in PSP on MY computer lol

Note: I really hope entering this notebook in to the listed challenges are okay, but I couldn't find anything in the rules that said it was for cards only. If not, then that is absolutely fine :)

PS. Please ignore the grubby white card on the photos, that is what I use on top of my craft mat when I am colouring in lol


The before picture. Yucky! As always, click on the images to view in full.
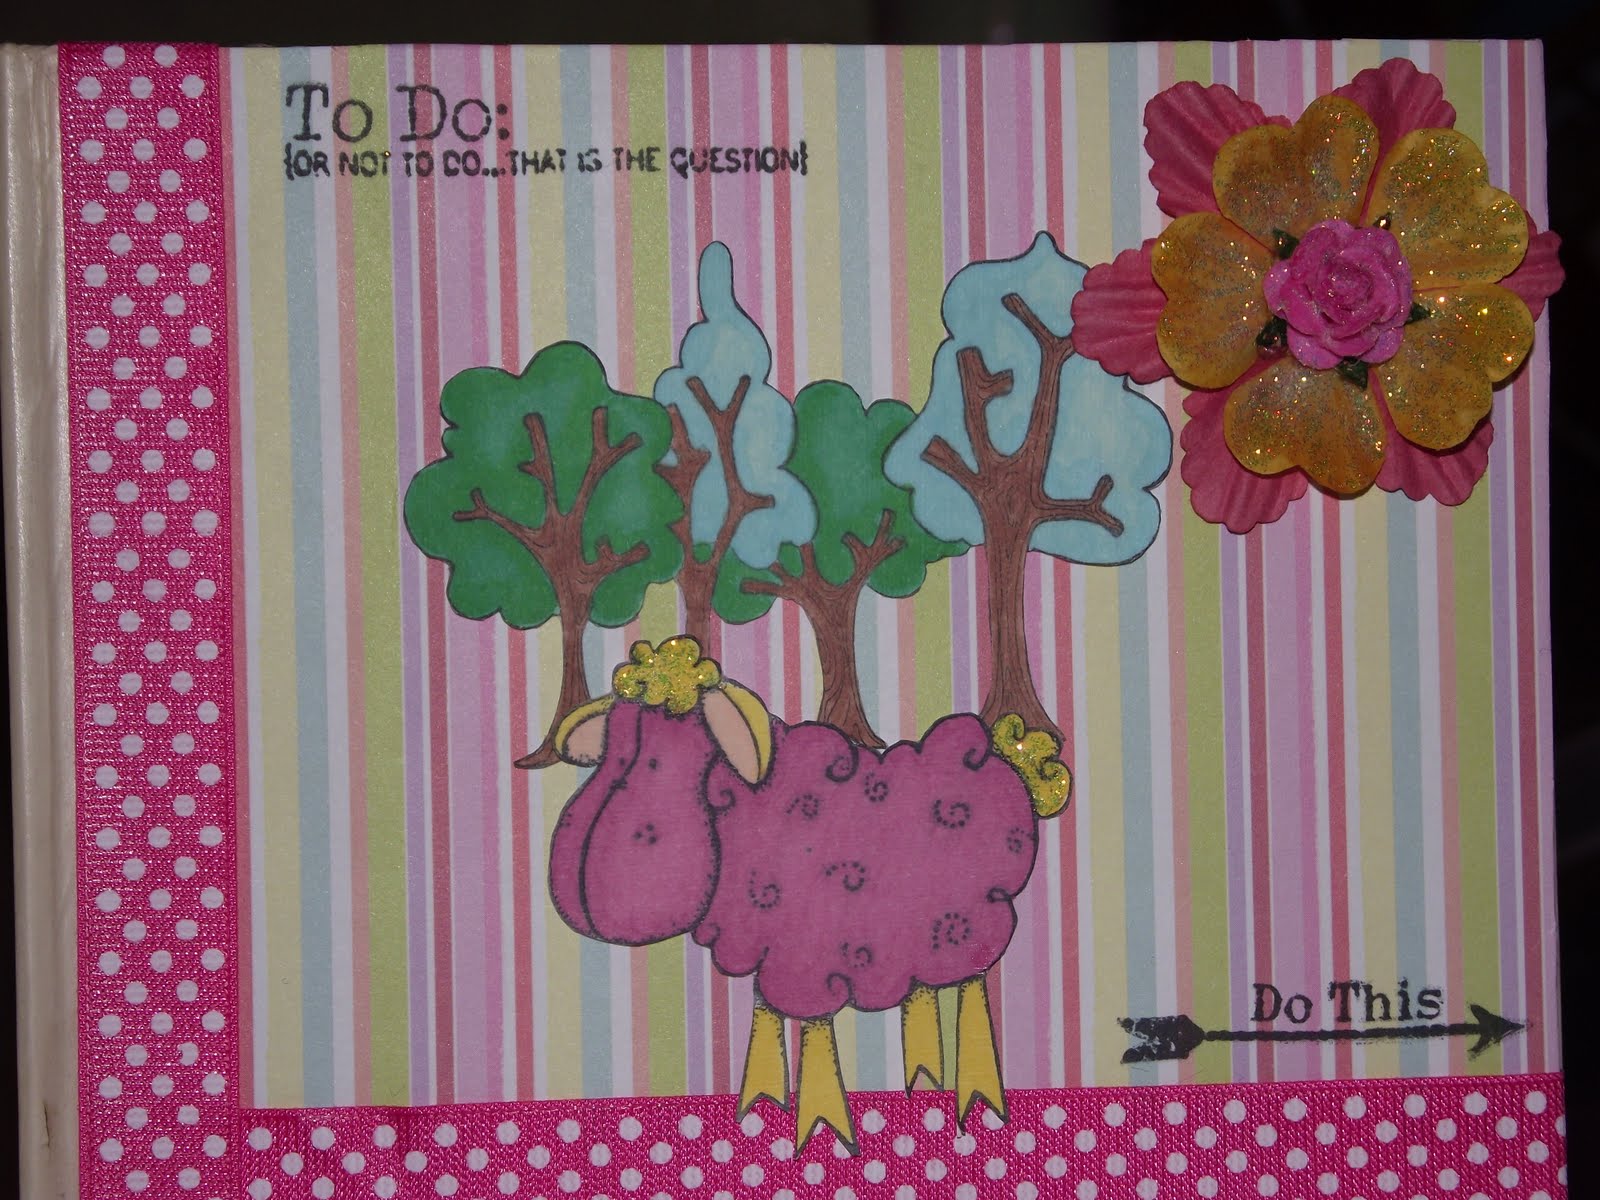


Front.


Back.


Inside. Not the most perfect, but it will do! As you can see I removed the old ribbon marker and made a matching spotty one.

And below a few extra photos, juct click on them to enlarge :)


I would like to enter my altered note book in to the following challenges please:


Wow, I didn't realise it was eligable for so many! Hopefully is IS eligable anyways, if not I will have to have a re-think!

Recipe:

  • One dirty tatty old notebook
  • Striped designer paper is Smirk
  • Magnolia sheep and trees images
  • Prima flowers
  • Wild Orchid flower
  • Pink spotty ribbon
  • White florists ribbon
  • To Do {or not to do... that is the question}, Do This ---->, This item belongs to:, and Designed by: Stamps from Basic Grey
  • White buttons
  • Stickles
  • Flat back self adhesive Pearls
  • Calendar tab
  • ProMarkers {Cinnamon, Cool Aqua, Mint Green, Grass, Ivory, Rose Pink, Tulip Yellow and Blush}
  • White card stock

Sunday, 8 August 2010

Two Cards

I've been a busy bee again.
Two new cards :)

Here is the first one, Tilda, and as you can see, I am really loving my new Nellie Snellen dies :D
Though I really need to see if I can do anything with my camera settings to make the pictures not so blurry.


I would like to enter this card in to the following challenges:

And finally, an Edwin card, though I am not 100% sure about this one, it feels like something is missing from it?
Ah well, can't get 'em all to be how we wanted them to be I suppose lol


I would like to enter this card in to the following challenges:

Wednesday, 4 August 2010

Tilda Card, Bracelet & Altered Jar

I am very proud of myself today, not only have I completed a new card, I have also made a 'tester' bracelet and an altered jar.

First up is a Tilda card that I made for my friend in the US' birthday.
I coloured her in a couple of days ago with me new ProMarkers.
I had to order some new ones as I didn't have any 'pastel' coloured ones, and as they were under £5 a pack, I figured why not!


I would like to enter this card in to the following challenges:

Recipe:
  • Tilda pre-stamped image {from eBay}
  • ProMarkers
  • Stickles
  • Anita's Glossy Accents
  • Pin
  • Self Adhesive Flat Pearls
  • Mulberry Paper Flowers
  • Leaf
  • Laura Ashley Paper {deep purple}
  • Papermania Papers {pink & lighter purple}
  • 3D Foam pads to lift Tilda off the card


Next up is a little bracelet that I quikcly put together, more of a tester, to see whether I would enjoy making more before I bought all the tools and lots of beads.
And I found some wire and basic beads in my stash, so I gave it a go, and I did enjoy it, so I will be investing in some better beads and tools etc. soon!


Recipe:

  • Wire
  • Beads

And lastly is an old pasta sauce jar that I altered to put my new mulberry paper flowers in.
As the lid was green all over I decided to keep the green theme.
I didn't have any green ribbon though, so I recycled an old piece of green ribbon I had laying around.


As you can see, the paper didn't go all the way around, but you can see all those yummy flowers and delishious colours!

Recipe:
  • Empty glass pasta sauce jar
  • Papermania paper
  • Ribbon
  • Prima Flower
  • Lovely mulberry paper flowers to fill jar
I almost forgot....
I got new toys a few days ago, a sealing wax gun, wax, and a 'J' sealing coin, and I totally *heart* it!
I can easily see how addictive this might become!


Saturday, 31 July 2010

I Really Should be a Better Blogger!

OMG I haven't updated since April!
Then again, I really haven't done all that much crafting since then.
I promise I will do more crafting and update my blog more often from here-on in!! I promise!

Anyways, here are the few makes I have done since then, including a couple of kitting projects I am working on. Be nice, I am a first-time-self-taught-knitter!

Oh yes, and I have had a birthday recently too and got some new crafty pressies, including more ProMarkers, Jewellery making stuff and a few other bits and pieces.


Large Marilyn Twisted Découpage. Needs a sentiment putting on it.


Smaller Marilyn Twisted Découpage. Needs a sentiment putting on it.


Smaller Marilyn Twisted Découpage. Needs a sentiment putting on it.


Large Audrey Découpage. Needs a sentiment.


Large Audrey Découpage. Needs a sentiment.


Father's Day card for my Step-Dad.


Owl Card #1 from the C&C POTW in July, which I got for my birthday.


Owl Card #2, which my son and I made for his school teachers.


Knitting Project #1 - Day 1 - I totally *heart* this funky furry wool!


Knitting Project #1 - Day 2


Knitting Project #1 - Day 3


Knitting Project #1 - Days 4 & 5 - Not much done as I was hunting out a loose thread lol


Knitting Project #1 - Day 6


Knitting Project #1 - Day 7 - Againg not much done as I was chasing another loose thread lol


Knitting Project #1 - Day 8


Knitting Project #2 - Day 1 - For some reason this seems a lot softer than the other blue project, yet it is the same type of wool?

Anyways, that is all for now.
And I WILL stick to my promise, as I don't want to keep lumbering you all with these long rambling posts and lots of pics in them lol

Tuesday, 5 January 2010

Catch Up

You might notice that in yesterday's post, I said it was going to be a catch up post, well, after all the waffling I did I though that I would keep yesterday's post to just the card for the Cards for Men 2nd Challenge, so here is the rest of the stuff I made over Christmas.
As always, click on the images to enlarge.

Firstly is a cheque/money holder I made for our nephew, James.


The front.


Inside, complete with moolah.


And the back.
See the recipe at the bottom of the post.


Two tags that I made using one of 'The Snowman' stamps that I got for Christmas (early).


A faerie christmas tag. I made a few of these for my own pressies lol
There was loads more tags, and a really nice one using another 'The Snowman' stamp and sentiment, but I forgot to take a picture of it lol I'll have a look through my scrap box later to see if I remembered to save them!

And finally, a cheque/money holder that I made for my brother, which I haven't even mailed out yet!! Sorry Steven, it will be in the post soon, I promise!


The front. Love this digital stamp!


The middle, complete with cheque.


And the back.


Recipes:


Money Holder:

  • Pale Blue Card Stock
  • White Card Stock
  • Christmas Paper from Papermania {front}
  • Claire Curd's Signiture Range, The Big One {inside & back}
  • Stamp Letters from See-D's
  • Embellishments from stash
  • Sentiment computer generated
  • Christmas Tree and Pressie Stamp from a papermania's duo set
  • Whispers Brush Marker Pen {Black}
  • ProMarkers
  • Embossing Powder
  • £20 ;)

Tags:

  • White Card Stock
  • The Snowman Wooden Rubber Stamps: Joyful
  • Fairy Stamp {Create & Craft I THINK!}
  • ProMarkers
  • Embossing Powder
  • Silver Twine

Cheque Holder:

  • Red Card Stock
  • White Card Stock
  • All papers from PaperMania
  • Simples Christmas Digital Stamps {details in an earlier post}
  • Christmas Tree and Pressie Stamp from a papermania's duo set
  • ProMarkers
  • Stickles
  • White Gel Pen
  • Anita's 3D Gloss Finish
  • 1 Cheque ;)

Monday, 14 December 2009

It's Christmas. Simples!

Here is the card I have just finished making, and I thoroughly enjoyed colouring him in with my new ProMarkers!

This card will be intended for my son this year, and it also fits the bill for the first Challenge at Cards for Men.

As always, click on the image to enlarge and view in better detail.
You might not be able to tell but that little lighter colour on his nose is dusky pink! Also I coloured him in twice and popped him up onto foam pads to make him stand out some more!
It looks a lot better in real life!


Recipe:

  • Red Cardstock
  • Christmas Simples Digital Stamp from Sandra Dry
  • ProMarkers (I will edit the colours in later)
  • La Pashe Acetate & Peel-off pens
  • Laura Ashley Designer Paper
  • S O N silver stickers (coloured in green La Pashe pens)
  • Whispers Brush Pens
  • Diamond Stickles
  • Scrap Card
  • Computer Generated Sentiments
  • Double sided sticky tape

Thursday, 20 August 2009

Thank You Card made by my Son :)

I thought I would share this card that I helped my 10 year old son to make for his Great-Auntie Sandra, to say 'Thank You' for the watch she gave him, which belonged to my Uncle Steve before he died last month.

As always click on the images to enlarge :)


The card along with the matching envelope that I made.


Close up of the card.


A better shot?


And the envelope.


Recipe:

  • White card stock
  • White paper stock
  • 'Girl with Flowers' digital stamp by Elizabeth Pujalka from Softpencil on Etsy
  • Papers including the paper to make the envelope from The Big One by Clare Curd available from Stamps.co.uk
  • Tags from Papermania's Designer Shapes from madaboutcards.co.uk
  • Brown Ribbon from the Papermania Couture Brown Ribbon pack
  • Green Ribbon from the 'Naughty but Nice' Smirk Embellishment Tote from madaboutcards.co.uk
  • Butterflies from a 'Butterflies and Hearts' pack I picked up from a local craft store
  • Standard colouring pencils
  • Faber-Castell Chalks for the sky and her cheeks. Colours used were; 152 (middle phthalo blue), 146 (sky blue) and 119 (magenta hell)
  • Diamond Stickles from madaboutcards.co.uk from edirectory.co.uk

Also I received my latest bacth of goodies that I ordered a few days ago, which I can't wait to get using :)


A5 Watercolour Pad (from artdiscount.co.uk), Reeves Watercolour Tube Set (Just £4.49 from artdiscount.co.uk) and a Fiskars Paper Crimper from (Amazon.co.uk) which I specifically got for next years birthday cards after seeing this tutorial from splitcoaststampers.com

Thursday, 6 August 2009

Recipes for Previous Cards

Here are the recipies for the cards I posted on 29th July.
Most links link directly to the product.


Card One (Brother Card):

  • Card was a free sample from stamps.co.uk
  • Dark blue stock paper
  • White card stock
  • See D's So Big Alphabet stamps
  • Rainbow Sparkle Embossing Powder (No longer available from where I got it from)
  • Self-Adhesive Foam Numbers from stamps.co.uk
  • Diamond Stickles from stamps.co.uk
  • Small gem embellishments from 5mm Round Coloured Gems pack from madaboutcards.co.uk (Often out of stock, gotta be quick to get these!)
  • Anita's Narrow Blue Organza Ribbon from madaboutcards.co.uk
  • Papermania Foam Stamps from ???
  • 'Hand Stamped by....' stamp from madaboutcards.co.uk pound shop
  • Gluegun
  • Black ink
  • Whispers Black pen
  • Silver pen
  • Craft Knife
  • Anita's Tacky Glue Glue from madaboutcards.co.uk

Card Two (Balloon):

  • White card stock
  • Red paper stock
  • Balloon Template FREE download from timeforcrafting.co.uk (I scaled it up quite a bit and my son didn't use it as a card shape, instead *he* rounded off the flat edge)
  • Printable 'Happy Birthday' backing paper from madaboutcards.co.uk
  • Self-Adhesive Foam Numbers from stamps.co.uk
  • See D's Birthday Words Collection? (It came in a set)
  • See D's Birthday Collection? (It came in a set)
  • Anita's Narrow Blue Organza Ribbon from madaboutcards.co.uk
  • Diamond Stickles from stamps.co.uk
  • Scrap piece of red ribbon
  • Stock silver glitter
  • Black Ink
  • Red Ink
  • Whispers brush pens
  • Funky Scissors to create the jagged edge effects from madaboutcards.co.uk
  • Anita's Tacky Glue Glue from madaboutcards.co.uk

Mini Box Project:

  • White card stock
  • Black paper stock
  • Blue paper stock
  • Inner backing paper all from a 2x12 Colossal Border Strip pack from madaboutcards.co.uk
  • See D's So Big Alphabet stamps
  • Powder Blue Sparkle embossing powder
  • Star Embellishments from a local craft store
  • Diamond Stickles from stamps.co.uk
  • Photograph printed from PC
  • Small gem embellishments from 5mm Round Coloured Gems pack from madaboutcards.co.uk (Often out of stock, gotta be quick to get these!)
  • UR 21 Plastic Number Plate embellishment from madaboutcards.co.uk
  • Anita's Sticky Ribbon - Check/Tartan from stamps.co.uk
  • Self-Adhesive WhiteSticker
  • Happy Birthday Stamp from a See D's collection
  • Red Foam sheet from madaboutcards.co.uk
  • Anita's Tacky Glue Glue from madaboutcards.co.uk
  • Heatgun
  • Metal Paperclip
  • Blue Ink
  • Red Ink
  • Black Whispers brush pen
  • Red Whispers brush pen
  • Scoreboard and bamboo folder
  • Silver tag (source unknown)
  • And a cheque ;)

Card Three (Mother's Day):

  • Part of a kit that is no longer available. I have the same card available for sale for just £2.90 including P&P (UK only) leave a message if you are interested with your e-mail address.

Card Four: (Get Well Soon):

  • Green pre-folded card from local craft store
  • Red paper stock
  • Petals made from various papers from the Creative Tones pack and the 'Love' pack from the Colossal Paper Pack collection from Papermania. The packs my son used from the Creative Tones collection were; 'Amethyst Infusion', 'Antique Cream', and Venetian Skies'
  • 'Pot' made from a sheet of paper from the Simply Elegant Colossal Paper Pack from Papermania
  • Impress Machine
  • Impress Upper Case Italics die cuts
  • Anita's Tacky Glue Glue from madaboutcards.co.uk
  • Diamond Stickles from stamps.co.uk

Wednesday, 28 January 2009

More goodies arrived + Freebies (kinda)


YaY! The rest of my goodies arrived today.

Quilling papers (I forgot to get a quilling pen, so that is on my next 'to get' list), waterbrushes, funky foam cut out shapes and stickles. Along with a FREE Marie Curie Cancer Care Card Bag. I thought that the bag would be a pack of 5 or 10, but nope they are singular bags lol oh well, I will have to get more the next time I order *cough cough*


This was the first time I had ordered from stamps.co.uk so when I found the little card at the bottom I was surprised to find a little free embellishment attached to it. It is the cutest little ladybird ever! (See pic below). (How many 'little's did I just write there?? LOL)


The card reads:


FREE sample with next order
Put 'FREE CARD' in the box at checkout to receive a FREE Papermania Card & Envelope. Valid until January 31st 2009

PASS this on to a friend and they can try it too!

FREE Touchy Feely!
Enjoy your FREE sample Lady Bird (EMB458) ONLY £2.99p for 60!


So there you go, I have passed it along lol


Speaking of goodies.....

I have been on another spending spree (well..... there was 10% off everything!) so............
I am looking forward to receiving the following in the next few days:

Corrugated Card, Double sided tape, more Hot Melt Glue Sticks, U R 21 Embellishment ('cus I can't find where I put the last one I bought for my Brother's special card for his 21st this year), 4x sets of Papermania Paperpacks (£1 each, can't complain!), Hand Stamped By....... stamp, Child's Angel Mini Stamps (hey for 50p you wouldn't turn it down neither!), Pigment inks, Heat Gun, 7x Embossing powders, Large Scissors (so I don't ruin any more 'kitchen' pairs lol), Angled tweezers (so I don't ruin my eyebrow tweezers), Clear Away Tray (to save on paper, and glitter getting EVERYWHERE), Decoupage scissors (ya never know when ya need those little 'uns), and finally a new craft knife, as the one I have has a tarnished handle plus it's blade needs changing and I'm too scared to do it myself! Knowing my clumsiness I will chop off a finger (again. - Don't ASK!!)


So there we have it. I think that is the last of my goodies to come, crafting wise anyways!

Looking forward to that stash coming, as I need the papers to finish off this little mini box I am making for my Brother.


And finally to report, I have finished stitching Lumpy, the free mini cross-stitch, he is on the radiator drying off, as I like to wash and iron my finished cross-stitches, so I will post a pic of him dried, ironed and in his frame later!


Gotta go get the tea ready for later, we sticking with the healthy eating crap. Tonight we are having Creamy Mushroom Pappardelle!


Take Care & Happy Crafting!