
And I feel so guilty about it as my new obsession is only FACEBOOK!
So yes, I broke one of my new year's resolutions, which was to blog every day!
I'm bad I know, but this time I promise to blog more often!
Anyways with a bunch of birthdays and Christmas just around the corner, what better time to pick up my blog to showcase my makings!
And as I haven't posted in a while, and some birthdays have been and gone, I best post them here to get up to date!
As always, click the images to enlarge :)


Firstly, it was my brother's 21st birthday in March, and my first attempt at using stamps only to create a card. I stamped 'BROTHER' using letters from a See D's collection. I then embossed it using 'Midnight' from create n craft. I then gentle inked my black inkpad all over the front and around the edge. I glued some blue stock paper to the card before attaching 'BROTHER' ata slight angle and roughly drawing the black border. I then attached a 2 and 1 foam shape along with 10 gem embellishments. Using a craft knife I created two slits for the ribbon to pass by. Finally I used Stickles to create another border, let it dry then wrote ' To a Special' and 'Happy Birthday'.
For the back, I used a foam shape to create the flower on to some card, inked and embossed it, and inked around the edge. Then I stamped 'Hand Stamped By', which unintentionally left a funky-rough edge around it, so I decided to keep that, then I embossed that too. Finally I inked a foam smaller 3 flower stamp, inked the edge and embossed that too before signing my name.


This card was made by my son, for my brother's 21st.
He used some card stock for the main card, with some 'Happy Birthday' backing paper.
He then used a balloon template to create the errr balloon with some red stock paper then inked the edge. He attached some scrap ribbon to create the whole balloon effect. He used a multi 'Happy Birthday' stamp from a See D's collection and used some funky scissors to cut it out before inking the edge. The same applies to the Birthday Cake. He coloured it in with Whispers Brush Pens. He also attached foam numbers then using the Impress Machine and dies he cut out 'STEVEN' before spreading glitter all over the place lol.
He created the inside tag the same way as the two on the front, and the same goes for the tags on the back.


For his birthday I got him an experience day, to go visit a football ground, as I was sending it early and was kinda rushing it, I did not have any wrapping paper in the house, so I dug out an AIRMAIL kit I bought years ago, as I knew it had some plain brown paper in there, plus it was nice and thick and looked good. I jazzed it up a bit with a handmade tag, from said brown paper. I inked the edge with brown ink, cut out STEVEN with my Impress Machine and dies and used a pen to outline the letters, I attached some ribbon top the tag, and used some (christmas) gold curling ribbon to tie it all together as I used flimsy tape on it so the paper could be re-used again!

This mini project was a pain in my backside!
I thought it would be nice for my brother to have as I had sent his birthda pressie early.
I started making it long before his birthday, as I knew it would take forever to make!
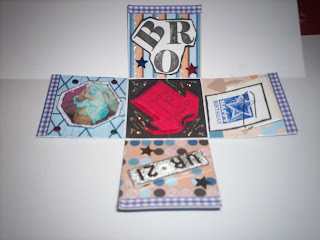
The first image shows 'BRO' stamped with stamps from a See D's collection. Image is inked slightly, with a couple of star embellishments and Stickles to highlight some of the lines on the backing paper. Sticky Ribbon attched to the top.
The second image shows a photo of my 'baby' brother, and you can just about see my arm, as I was holding him. This was attached to card, with Stickles used to fill in the white gap, and an inked edge. 4 gem embellishments were added. Sticky Ribbon attached to the top.


The 3rd image shows a plastic 'U R 21' plate embellishment along with some star embellishments and some Stickles applied to several of the dots on the backing paper. Sticky Ribbon attached to the top.
The 4th image shows a cheque holder that I made. 'Happy Birthday' is stamped on to card using a stamp from a See D's Collection. Edge is then inked and bottom is glued on to the inside of the box then using a metal paperclip the cheque is attached. 'Pull Out' is written on to a sticker. Sticky Ribbon is attached at the top.


The 5th image shows an overview where you can see the football shirt that I made from 2 pieces of foam and 2 pieces of card. I drew out the shape on some scrap card, then drew it on to 2 pieces of red foam, cut them out and stuck together (to make it more bulky), then I did the same for the card pieces, but slightly larger. I coloured the card in our team colour. Then added xxx as stitches around the edges, then I wrote his surname, and '21 today'. Added Stickle squiggles.
The 6th image shows the lid and the outer box. I applied the same backing paper to the box. I then inked the top and sides of the card and embossed it with 'Midnight' from create n craft and applied the Sticky ribbon around the top. I drew an 'S' on to some card and embossed that also, before applying it to another embossed circle card.


The 7th image shows the bottom of the box with a small 'Handmade by...' tag, along with the ribbon. I forgot to take a pic of the inside of the lid, but I used black stock paper in it, with a stamped 'Happy Birthday' then I drew tiny stars in gold pen around it.
The 8th image shows the final product with the ribbon and tag. I can't remember if I made the tag or if it's a pre-cut one. I THINK it might be a pre-cut one.
It's a good job I started making it early too, so it had time to be played with, as the lid fit was VERY tight!

My Mother's Day card for this year, and as it is very close to my brother's birthday, I didn't have time to make a new card, so I delved in to my 'previous makes box' and added a few stickers to it, so that I could post it along with my brother's cards.
I have quite a few of these cards, so if anyone wants to buy one, please contact me by leaving me your e-mail address in a comment. (Cards are £3 each, includes P&P) I will e-mail you back details on how to pay. I will post dimensions later.

Goodiesssssssss. I adore getting new goodies! I did get these a while back though when there was a HUGE sale on, and quite a lot of the stuff was only 50p each! Plus I got a buncha Smirk stuff too as I have been dying to get my hands on some since they came out!
Here you can see; two doCrafts magazines with free stickers (25p each!!!!), 3 12x12 funky card -not shown, a pack of 40 mini christmas stamps (for just £5!), Anita's Tacky Glue, 4 pairs of funky scissors (50p each!), 4 packs of Dovecraft Christmas Rose Tinted Shaker embellishments, 5 packs of Christmas backing paper, a wonderful fairy stamp, 2 packs of glue-gun glue, pack of forever friends decoupage card kits, darts and football decoupage card kits, 2x Smirk Ribbon Stickers, 2 Smirk Stamps, 2 Smirk packs of ribbon, Smirk Glitter tags, Smirk embellishment tote and a pack of 12x12 Smirk papers.
Oops almost forgot to mention, all from www.madaboutcards.co.uk and their sister site, craftpoundshop which can be accessed from MAC, you can also purchase items from both places with the same shopping cart.


Finally, a card made by my son for my Uncle, who was in hospital at the time.
He used a green pre-folded card. First he cut a strip of dark green stock paper and glued it in to place then he cut out four petal shapes from different paper stocks, using my hand drawn template. He then attached a dot in the centre of the petals.
Then he used my Impress machine and dies to cut out 'GET WELL SOON' then glued them in to place. Finally he cut out a 'pot' from some stock paper and applied some stickles to give it more definition, then I applied some swirly stickles to the card so it wasn't so plain (he is only 10, he couldn't do that part himself! On the inside, he attached a wallet sized (very recent) school photograph using some easy on, easy off tack, so my Uncle could take it off and put in his wallet later!
My uncle loved the card, and is now recovering well and back at home after 6 weeks in hospital!
I will post recipes for all the projects later, as I will need to rumage in my boxes for some of the items.
*insert siggy here later as it is not working at the moment!*


This mini project was a pain in my backside!
I thought it would be nice for my brother to have as I had sent his birthda pressie early.
I started making it long before his birthday, as I knew it would take forever to make!
The first image shows 'BRO' stamped with stamps from a See D's collection. Image is inked slightly, with a couple of star embellishments and Stickles to highlight some of the lines on the backing paper. Sticky Ribbon attched to the top.
The second image shows a photo of my 'baby' brother, and you can just about see my arm, as I was holding him. This was attached to card, with Stickles used to fill in the white gap, and an inked edge. 4 gem embellishments were added. Sticky Ribbon attached to the top.


The 3rd image shows a plastic 'U R 21' plate embellishment along with some star embellishments and some Stickles applied to several of the dots on the backing paper. Sticky Ribbon attached to the top.
The 4th image shows a cheque holder that I made. 'Happy Birthday' is stamped on to card using a stamp from a See D's Collection. Edge is then inked and bottom is glued on to the inside of the box then using a metal paperclip the cheque is attached. 'Pull Out' is written on to a sticker. Sticky Ribbon is attached at the top.


The 5th image shows an overview where you can see the football shirt that I made from 2 pieces of foam and 2 pieces of card. I drew out the shape on some scrap card, then drew it on to 2 pieces of red foam, cut them out and stuck together (to make it more bulky), then I did the same for the card pieces, but slightly larger. I coloured the card in our team colour. Then added xxx as stitches around the edges, then I wrote his surname, and '21 today'. Added Stickle squiggles.
The 6th image shows the lid and the outer box. I applied the same backing paper to the box. I then inked the top and sides of the card and embossed it with 'Midnight' from create n craft and applied the Sticky ribbon around the top. I drew an 'S' on to some card and embossed that also, before applying it to another embossed circle card.


The 7th image shows the bottom of the box with a small 'Handmade by...' tag, along with the ribbon. I forgot to take a pic of the inside of the lid, but I used black stock paper in it, with a stamped 'Happy Birthday' then I drew tiny stars in gold pen around it.
The 8th image shows the final product with the ribbon and tag. I can't remember if I made the tag or if it's a pre-cut one. I THINK it might be a pre-cut one.
It's a good job I started making it early too, so it had time to be played with, as the lid fit was VERY tight!

My Mother's Day card for this year, and as it is very close to my brother's birthday, I didn't have time to make a new card, so I delved in to my 'previous makes box' and added a few stickers to it, so that I could post it along with my brother's cards.
I have quite a few of these cards, so if anyone wants to buy one, please contact me by leaving me your e-mail address in a comment. (Cards are £3 each, includes P&P) I will e-mail you back details on how to pay. I will post dimensions later.

Goodiesssssssss. I adore getting new goodies! I did get these a while back though when there was a HUGE sale on, and quite a lot of the stuff was only 50p each! Plus I got a buncha Smirk stuff too as I have been dying to get my hands on some since they came out!
Here you can see; two doCrafts magazines with free stickers (25p each!!!!), 3 12x12 funky card -not shown, a pack of 40 mini christmas stamps (for just £5!), Anita's Tacky Glue, 4 pairs of funky scissors (50p each!), 4 packs of Dovecraft Christmas Rose Tinted Shaker embellishments, 5 packs of Christmas backing paper, a wonderful fairy stamp, 2 packs of glue-gun glue, pack of forever friends decoupage card kits, darts and football decoupage card kits, 2x Smirk Ribbon Stickers, 2 Smirk Stamps, 2 Smirk packs of ribbon, Smirk Glitter tags, Smirk embellishment tote and a pack of 12x12 Smirk papers.
Oops almost forgot to mention, all from www.madaboutcards.co.uk and their sister site, craftpoundshop which can be accessed from MAC, you can also purchase items from both places with the same shopping cart.


Finally, a card made by my son for my Uncle, who was in hospital at the time.
He used a green pre-folded card. First he cut a strip of dark green stock paper and glued it in to place then he cut out four petal shapes from different paper stocks, using my hand drawn template. He then attached a dot in the centre of the petals.
Then he used my Impress machine and dies to cut out 'GET WELL SOON' then glued them in to place. Finally he cut out a 'pot' from some stock paper and applied some stickles to give it more definition, then I applied some swirly stickles to the card so it wasn't so plain (he is only 10, he couldn't do that part himself! On the inside, he attached a wallet sized (very recent) school photograph using some easy on, easy off tack, so my Uncle could take it off and put in his wallet later!
My uncle loved the card, and is now recovering well and back at home after 6 weeks in hospital!
I will post recipes for all the projects later, as I will need to rumage in my boxes for some of the items.
*insert siggy here later as it is not working at the moment!*
No comments:
Post a Comment